Setting up a Celestia bridge node
This tutorial will go over the steps to set up your Celestia bridge node.
Breaking Change: Starting from celestia-node [TODO: Add version from PR #4768], bridge nodes now have pruning enabled by default. This means they will only store a limited amount of historical data. To run an archival bridge node that stores all historical data from genesis, you must use the --archival flag. See the pruning vs archival modes section for details.
Bridge nodes connect the data availability layer and the consensus layer.
Overview of bridge nodes
A Celestia bridge node has the following properties:
- Import and process “raw” headers & blocks from a trusted core process (meaning a trusted RPC connection to a consensus node) in the Consensus network. Bridge nodes can run this core process internally (embedded) or simply connect to a remote endpoint. Bridge nodes also have the option of being an active validator in the consensus network.
- Validate and erasure code the “raw” blocks
- Supply block shares with data availability headers to light nodes in the DA network.
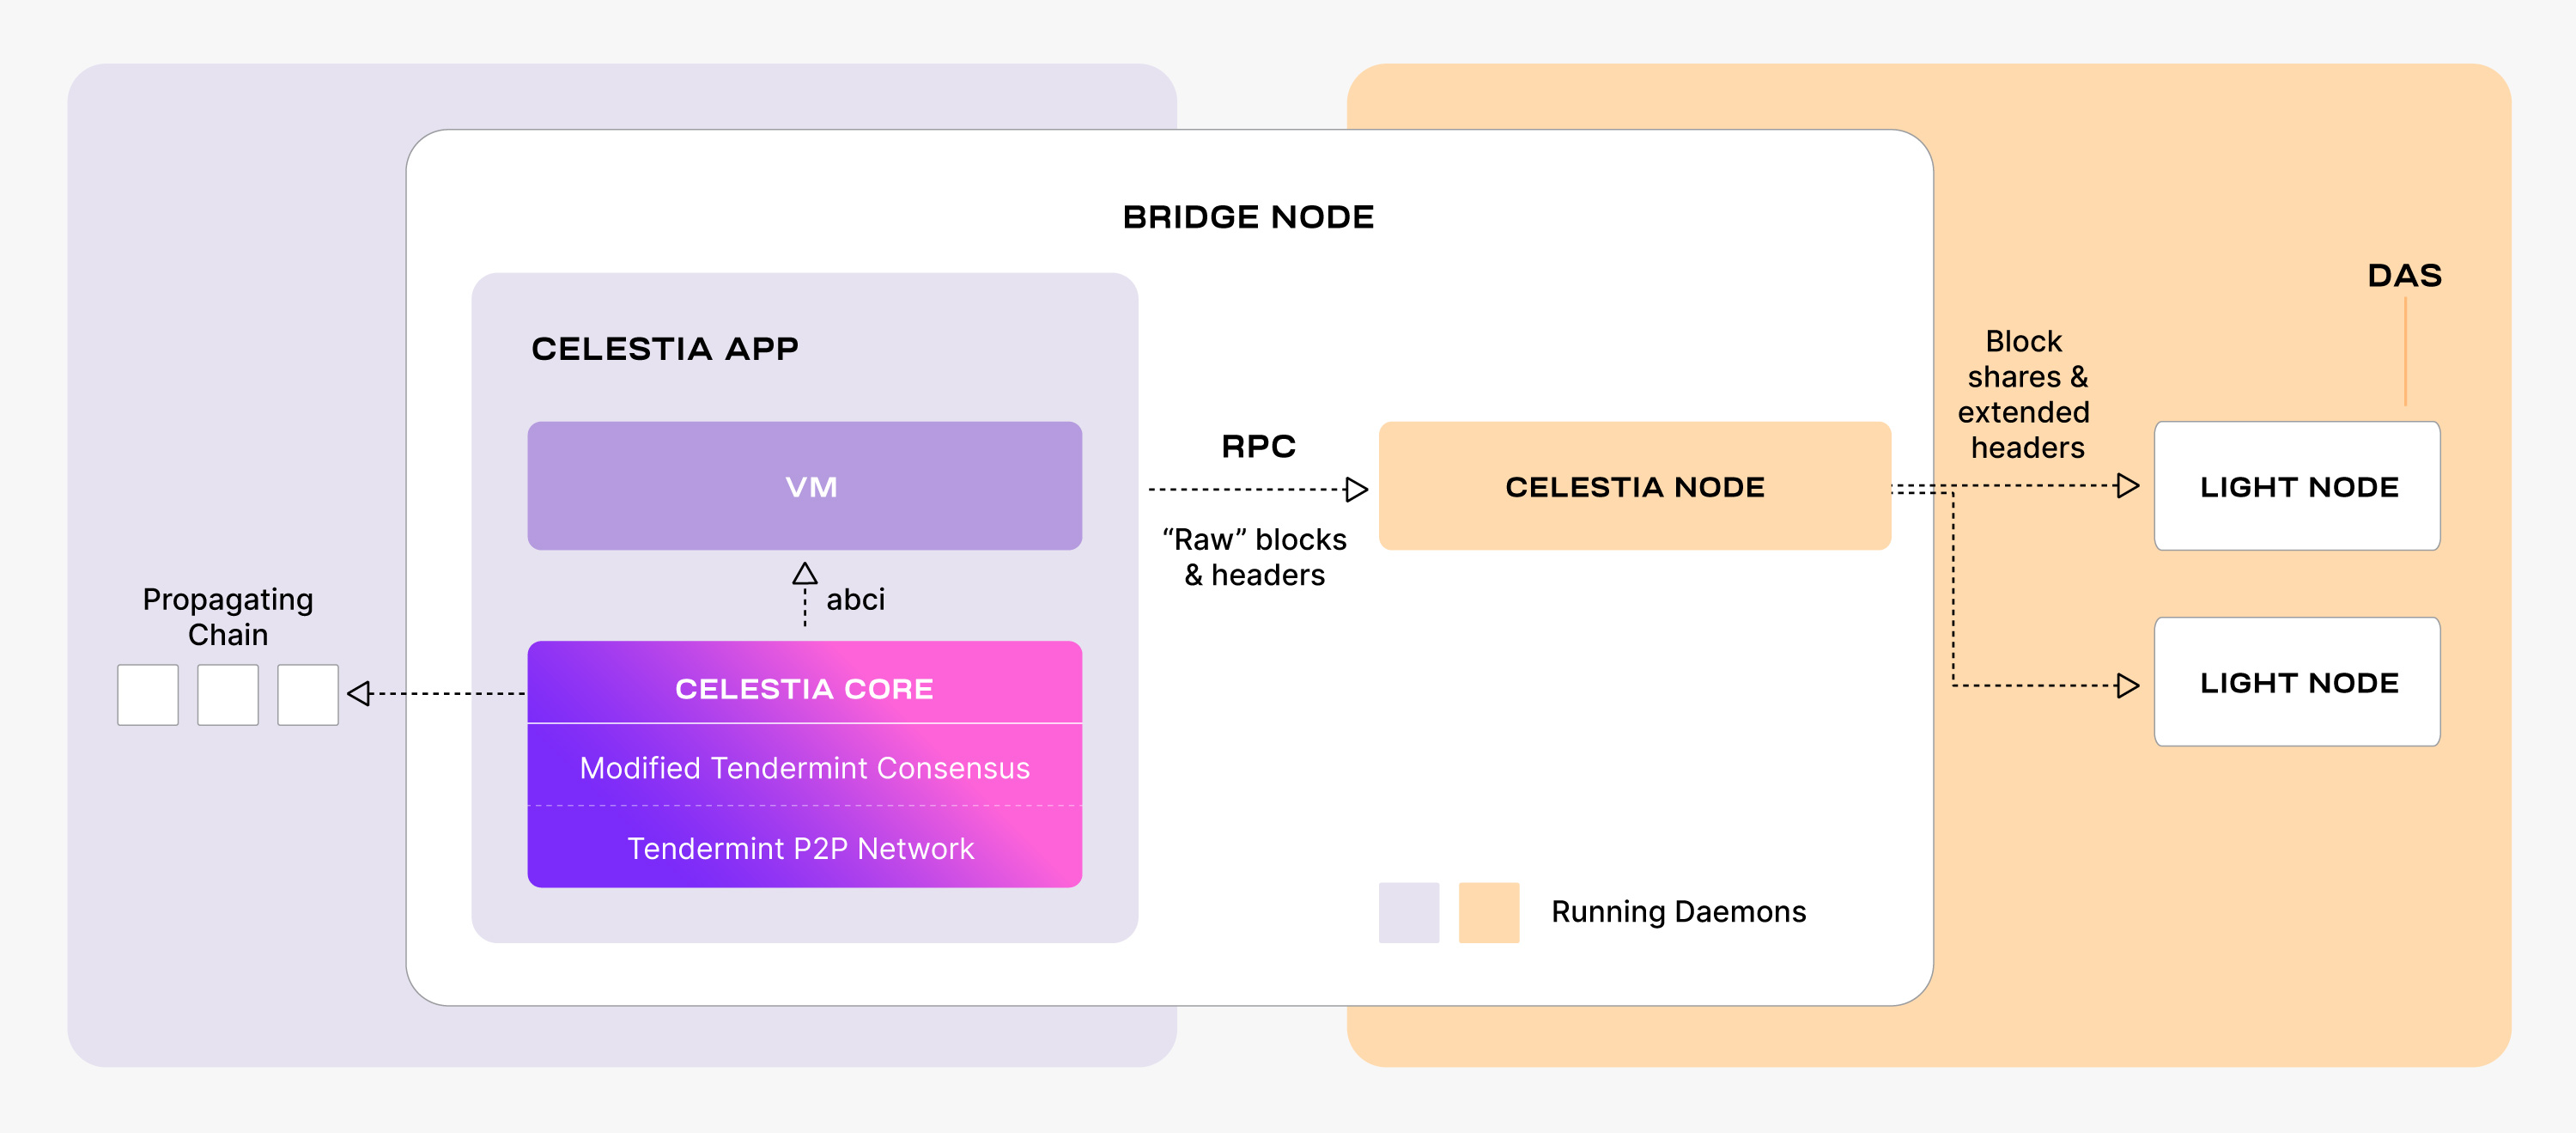
From an implementation perspective, Bridge nodes run two separate processes:
-
celestia-app with celestia-core (see repo )
- celestia-app is the state machine where the application and the proof-of-stake logic is run. celestia-app is built on Cosmos SDK and also encompasses celestia-core.
- celestia-core is the state interaction, consensus and block production layer. celestia-core is built on Tendermint Core , modified to store data roots of erasure coded blocks among other changes (see ADRs ).
-
celestia-node (see repo )
- celestia-node augments the above with a separate libp2p network that serves data availability sampling requests. The team sometimes refers to this as the “halo” network.
Pruning vs archival modes
Bridge nodes can operate in two modes:
Pruned mode (default)
- Default behavior: Bridge nodes now prune old data automatically
- Stores only recent blocks within the availability window
- Significantly reduces storage requirements
- Can sync from a recent height or hash instead of genesis
- Suitable for most use cases
Archival mode
- Stores all historical data from genesis
- Requires the
--archivalflag to enable - Much higher storage requirements (see hardware requirements)
- Necessary for applications requiring full historical data access
- Required if you need to serve data to light nodes for blocks outside the availability window
Routing Exchange Optimization: Bridge nodes automatically optimize header synchronization using a routing exchange mechanism. Requests within the data availability window are routed to the core exchange for complete blocks, while requests outside the window are routed to the P2P exchange for headers only. This optimization happens automatically without any configuration needed.
Choosing between modes
Use pruned mode (default) if you:
- Want lower storage requirements
- Only need recent blockchain data
- Are running a standard bridge node for the network
Use archival mode (--archival flag) if you:
- Need access to full historical data
- Are running infrastructure that requires all blocks from genesis
- Want to serve data for blocks outside the availability window
- Are running a bridge node on a private network without proper genesis hash configuration
Hardware requirements
Setting up your bridge node
The following tutorial is done on an Ubuntu Linux 20.04 (LTS) x64 instance machine.
Deploy the Celestia bridge node with the following steps.
Setup the dependencies
Follow the tutorial for installing the dependencies.
Install Celestia Node
Install the celestia-node binary, which will be used to run the bridge node.
Follow the tutorial for installing celestia-node.
Initialize the bridge node
Choose between pruned mode (default) or archival mode:
Pruned (default)
celestia bridge init --core.ip <URI> --core.port <port>After v0.21.5, the --core.port must be specified.
In most cases, it is port 9090 by default.
Warning: Make sure port 2121 TCP/UDP is open and publicly accessible on your bridge node so it can be discovered by other peers in the DHT network. This port is essential for P2P connectivity and if not properly configured, your node won’t be able to participate in the network effectively.
Refer to the ports section of the celestia-node troubleshooting page for information on which ports are required to be open on your machine.
Using an RPC of your own, or one from the list on the Mocha testnet page or list on the Arabica devnet page, start your node.
Connecting to a consensus node endpoint (flag: --core.ip string)
provides the light node with access to state queries (reading balances, submitting
transactions, and other state-related queries).
Here is an example of initializing the bridge node on different networks:
Mainnet Beta
Pruned (default)
celestia bridge init --core.ip <URI> --core.port <port>Run the bridge node
Start the bridge node with a connection to a consensus node’s gRPC endpoint, which is usually exposed on port 9090:
Pruned (default)
celestia bridge start --core.ip <URI> --core.port <port>Here are examples of starting the bridge node on specific networks:
Mocha:
Pruned (default)
celestia bridge start --core.ip rpc-mocha.pops.one --core.port 9090 --p2p.network mochaArabica:
Pruned (default)
celestia bridge start --core.ip validator-1.celestia-arabica-11.com \
--p2p.network arabica --core.port 9090If you’re connecting your bridge node to a localhost consensus node (--core.ip localhost or --core.ip 127.0.0.1), ensure that gRPC is enabled in your consensus node’s app.toml configuration file. Look for the [grpc] section and verify that enable = true is set:
[grpc]
# Enable defines if the gRPC server should be enabled.
enable = true
# Address defines the gRPC server address to bind to.
address = "localhost:9090"
Without proper gRPC configuration, the bridge node will not be able to connect to the consensus node.
You can create your key for your node by following the cel-key instructions.
Once you start the bridge node, a wallet key will be generated for you.
You will need to fund that address with Testnet tokens to pay for
PayForBlob transactions.
You can find the address by running the following command:
./cel-key list --node.type bridge --keyring-backend test --p2p.network <network>You do not need to declare a network for Mainnet Beta. Refer to the chain ID section on the troubleshooting page for more information.
You can get testnet tokens from:
Note: If you are running a bridge node for your validator, it is highly recommended to request Mocha testnet tokens as this is the testnet used to test out validator operations.
Optional: run the bridge node with a custom key
In order to run a bridge node using a custom key:
- The custom key must exist inside the celestia bridge node directory at the
correct path (default:
~/.celestia-bridge/keys/keyring-test) - The name of the custom key must be passed upon
start, like so:
Mainnet Beta
celestia bridge start --core.ip <URI> --keyring.keyname <name-of-custom-key> \
--core.port <port>Optional: Migrate node id to another server
To migrate a bridge node ID:
- You need to back up two files located in the celestia-bridge node directory at the correct path (default:
~/.celestia-bridge/keys). - Upload the files to the new server and start the node.
Optional: start the bridge node with SystemD
Follow the tutorial on setting up the bridge node as a background process with SystemD.
You have successfully set up a bridge node that is syncing with the network.
Optional: enable on-fly compression with ZFS
Follow the tutorial on how to set up your DA node to use on-fly compression with ZFS.
Migration guide for existing bridge nodes
[TODO: Add migration guide once PR #4768 is released with specific version number and finalized migration instructions]